NHA SND Indicator V1.0 MT4: A Practical Guide to Trading Supply & Demand
If you’ve been hunting for a clean, rules-first way to spot high-probability zones, the NHA SND Indicator V1.0 for MT4 is a solid pick. It focuses on Supply & Demand (S&D) imbalances—the areas on a chart where institutions tend to leave footprints—so you’re not chasing price; you’re letting price come back to you. The best bit? It works on any pair and any timeframe, from scalping on M5 to swing trading on H4 or even daily. This guide walks you through what it does, how to install it, how to use it step by step, and a few battle-tested strategies that fit right into your existing plan.
What is the NHA SND Indicator?
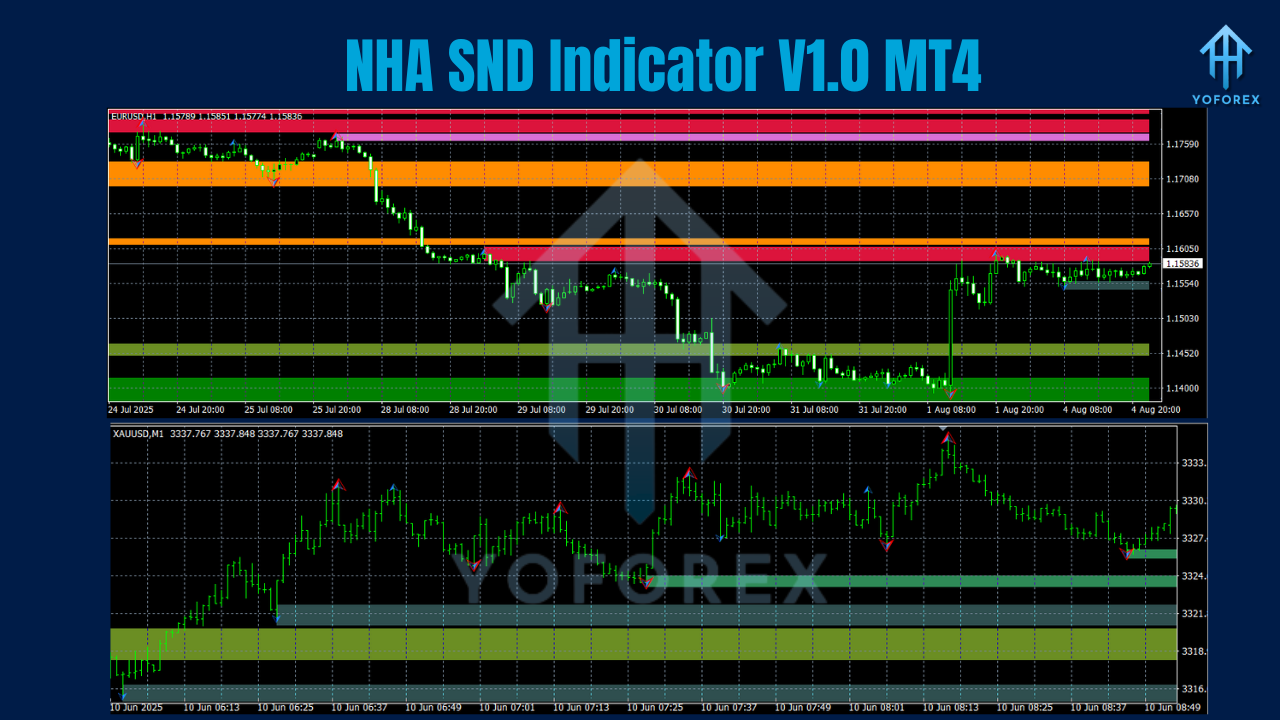
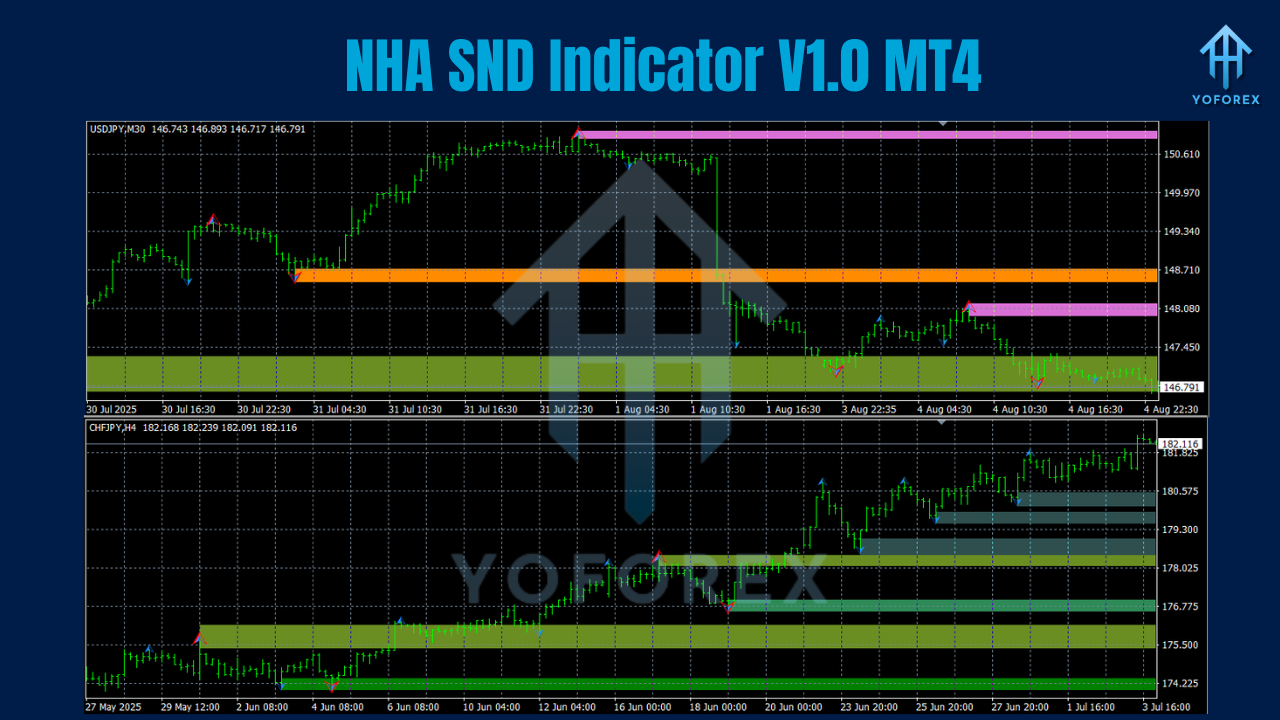
The NHA SND Indicator marks Supply zones (potential short setups) and Demand zones (potential long setups) based on the logic of institutional order flow—where aggressive orders created an imbalance that pushed price away quickly. When price revisits those zones, you get tradable reactions more often than not, especially if you apply confirmation.
Unlike noisy indicators that repaint endlessly or flood your screen with clutter, a good S&D tool highlights only the key levels and the structural context around them. NHA SND aims to:
- Identify and draw fresh and respected zones.
- Distinguish between strong and weak zones using breakout impulses.
- Offer optional alerts, so you don’t stare at charts all day.
- Stay flexible so you can trade any market, any timeframe.
How Supply & Demand Works (In Plain English)
- Demand zone: A price area where buyers overwhelmed sellers, creating a swift rally. When price revisits, it often bounces because unfilled buy orders may still be sitting there.
- Supply zone: The opposite. Sellers overwhelmed buyers, price fell hard, and on a retest, price often reacts lower again.
- Fresh vs. retested zones: Fresh zones haven’t been tagged since creation (more potent). Retested zones are still valid but may be weaker each tap.
- Impulse strength: The faster and further price moved away from a zone initially, the more meaningful that zone tends to be.
The NHA SND Indicator automates this identification so you can focus on execution and risk.
Key Features at a Glance
- Any Pair, Any Timeframe: EURUSD, XAUUSD, indices, crypto CFDs… M1 to D1—your call.
- Auto-Marked Supply & Demand Zones: Clear, colored rectangles for instant recognition.
- Fresh/Retest Tagging: Prioritizes untouched zones for higher probability entries.
- Multi-Timeframe Awareness: Optionally reference higher-timeframe zones while trading lower timeframes.
- Alert System: Get alerts on zone approach, breaches, or confirmations.
- Refined Zone Quality Filters: Filter by impulse strength, number of candles, or departure distance.
- Non-Intrusive Visuals: Clean look; no indicator soup.
- Backtest-Friendly: Stable drawing logic so you can forward-test without nasty surprises.
- Confluence-Ready: Works well with market structure, RSI divergence, or moving averages for confirmation.
- Risk Tools Compatibility: Easy to pair with EAs or scripts that set stop-loss and position size.
Installation & First-Time Setup (MT4)
- Copy the file: Place the indicator’s
.ex4or.mq4intoMQL4/Indicators/. - Restart MT4: Or hit Navigator → right-click Indicators → Refresh.
- Attach to chart: Double-click NHA SND Indicator from Navigator and apply it to any pair/timeframe.
- Tidy your chart: Use a clean template; S&D works best when you can see structure clearly.
- Adjust parameters: Start with defaults, then refine:
- HTF Zones: Enable if you want higher-timeframe zones overlaid.
- Zone Strength Filter: Set a minimum impulse distance (e.g., 2× ATR).
- Retest Limit: Limit number of allowed retests (e.g., 2).
- Alerts: Enable pop-up/notification when price taps a zone.
- Zone Opacity/Color: Personal preference; choose contrasting colors for clarity.
Smart Settings to Consider
- Min Departure Candles: 2–3 candles minimum helps weed out weak zones.
- Min Departure Distance: Use ATR-based thresholds so the filter adapts to volatility.
- Fresh-Only Mode (Optional): When markets are choppy, trading only fresh zones can improve selectivity.
- Extend Zones until Invalidation: Keep zones visible until broken decisively.
How to Trade NHA SND in Three Practical Styles
1) Intraday Bounce (Scalping or Day Trading)
- Timeframes: M5–M15.
- Setup: Identify a fresh demand zone in an intraday uptrend (higher highs, higher lows). Wait for price to return.
- Entry: Limit order at the top third of the demand zone or use a bullish confirmation candle (e.g., engulfing) within the zone.
- Stop-Loss: A few pips below the zone’s low (plus spread buffer).
- Take-Profit: First trouble area (prior high or mid-structure). Aim for at least 1:1.5 to 1:2 RR.
- Bonus confluence: Session opens (London/NY), 20–50 EMA slope, or RSI divergence.
2) Swing Retest (Trend Continuation)
- Timeframes: H1–H4 (even D1 for trend trades).
- Setup: In an uptrend, look for a higher-timeframe demand zone. Price pulls back into it.
- Entry: Partial position on first touch; add on confirmation (H1 bullish close).
- Stop-Loss: Below the zone; give swings room to breathe.
- Take-Profit: Prior swing high, then runner to trend line or next key level. Consider scaling at 1:2, 1:3 RR.
3) Breakout–Retest (Structure First)
- Timeframes: M15–H1.
- Setup: Price breaks a key structure level, creating a new zone at the origin. Wait for retest.
- Entry: Confirmation candle on retest (engulfing/pin bar).
- Stop-Loss: Just beyond the opposite edge of the zone.
- Take-Profit: Measured move of the prior impulse or the next structure pivot.
Risk Management That Actually Holds Up
- Risk per trade: 0.5%–1% for intraday; 1%–2% for higher-timeframe swing (if you must).
- Place SL outside the zone: If price closes beyond the zone boundary, the idea is likely invalid.
- Scale out: Bank partials at 1:1 or first structure, then trail the rest behind swing lows/highs.
- Daily stop: Cap your daily loss limit to protect mental capital; S&D shines with patience.
Backtesting & Optimization Tips
- Start with one pair: EURUSD or XAUUSD are popular; then diversify.
- Gather 100+ samples: Track win rate, average RR, and maximum drawdown.
- Tag confluence: Did the best trades align with trend, session times, or divergence? Keep notes.
- Refine filters: If you get too many mediocre zones, increase minimum impulse or enable fresh-only.
- Forward test 2–4 weeks: Demo or tiny live risk. The goal is execution discipline, not heroics.
Common Mistakes to Avoid
- Overtrading every zone: Quality > quantity. Fresh, strong zones in-line with trend usually win.
- Stops inside the zone: Don’t suffocate the trade; SL belongs outside.
- Forcing trades during news: High-impact events can bulldoze zones. Stand aside or widen stops on purpose (carefully).
- Ignoring structure: S&D is strongest when aligned with market structure and momentum.
Putting It All Together
The NHA SND Indicator V1.0 MT4 helps you trade location first—find the high-quality areas where institutions likely acted, then wait for price to come to you. It’s adaptable to any pair and timeframe, light on chart clutter, and works beautifully with your existing structure and risk rules. If you keep the process simple—prioritize fresh zones, align with trend, and never skip risk management—you’ll have a repeatable playbook you can refine week after week.
Trade selectively, review your journal, and let the market come to your zone. That’s the S&D edge.
Join our Telegram for the latest updates and support


Comments
Leave a Comment