MTF ZONE Indicator V2.0 MT4 — Map High-Probability Supply & Demand Zones
Tired of messy charts that scream “analysis paralysis”? The MTF ZONE Indicator V2.0 for MT4 focuses on the only thing that truly matters for price action traders: where buyers and sellers actually stepped in before. It auto-plots clean supply & demand / support-resistance zones from multiple higher timeframes onto your execution chart, so you can see the “big picture” and the entry trigger in one place. No more flipping feverishly between tabs… just actionable zones, alerts, and a plan. If you’ve been hunting for a multi-timeframe (MTF) zones indicator that stays light, readable, and practical, this is it.
What Is the MTF ZONE Indicator V2.0?
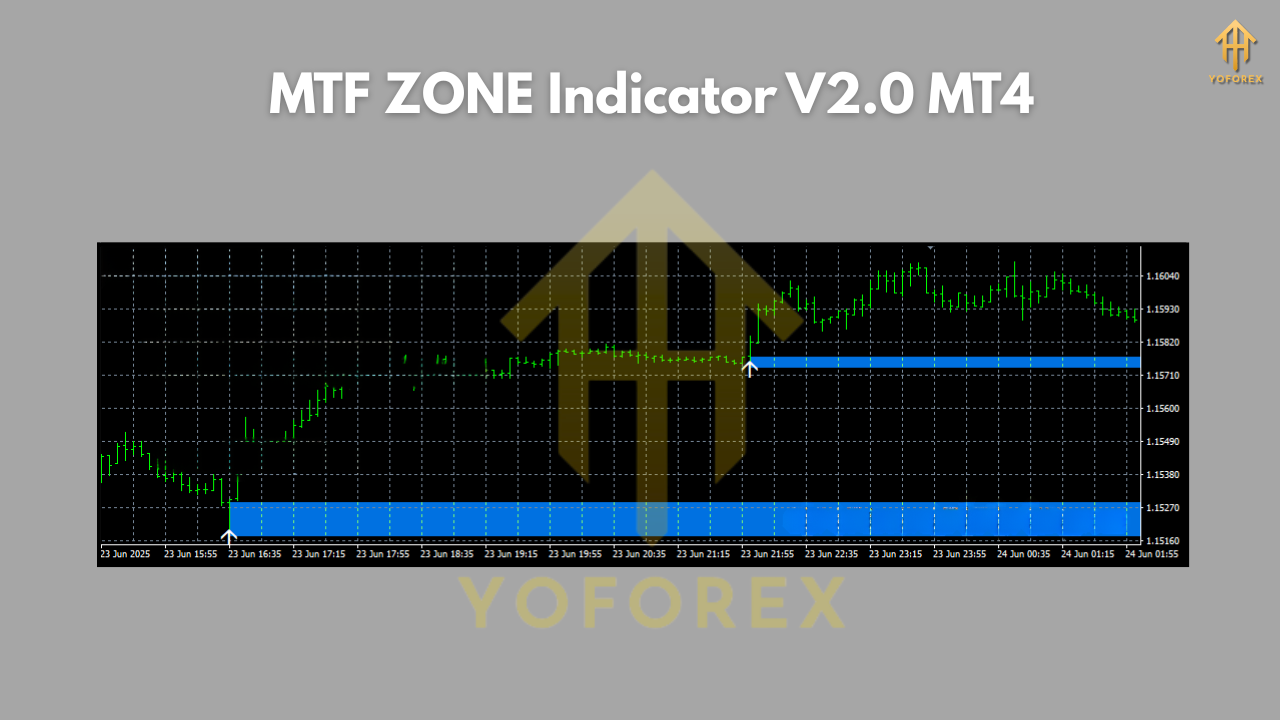
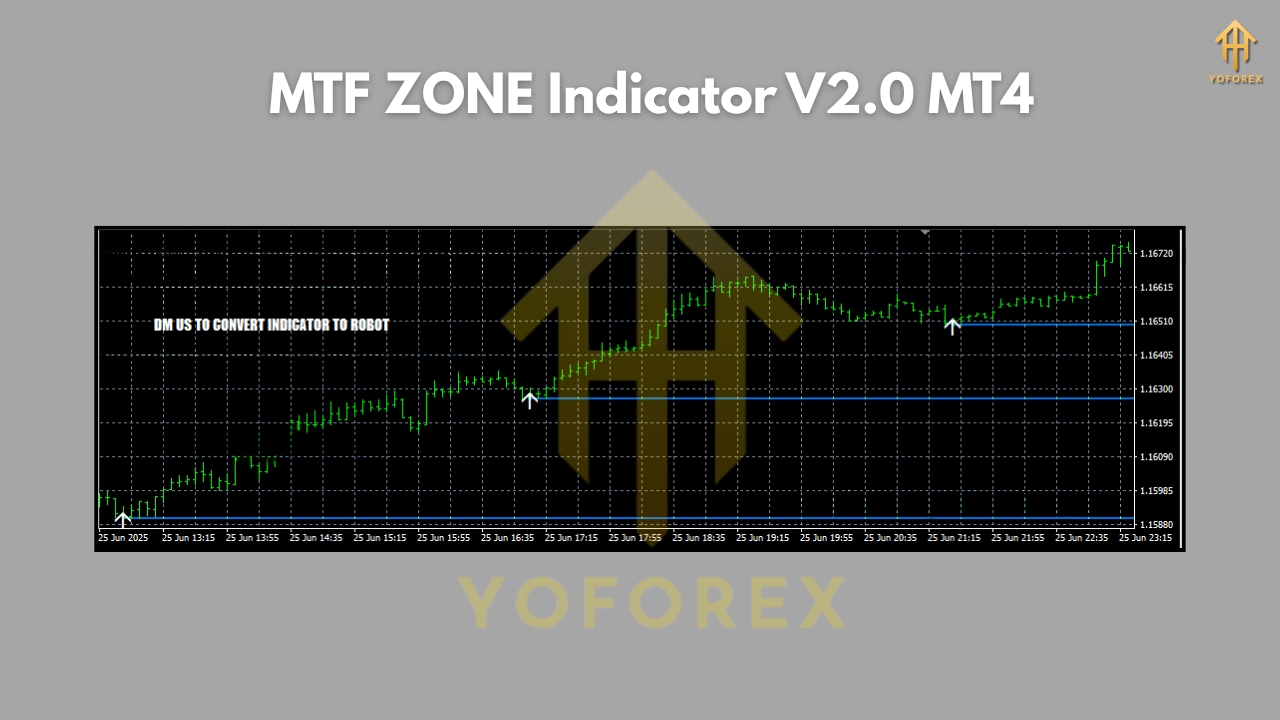
At its core, MTF ZONE V2.0 scans higher-timeframe candles (H1/H4/D1) to detect areas where price made decisive moves—impulse breaks, strong rejections, or consolidations followed by breakouts. Those areas are projected down to your lower-timeframe chart (commonly M15 or H1) as dynamic rectangles with optional labels and expiry conditions. As price returns to a marked zone, you’ll often see reaction flows: either a clean bounce, a shallow fakeout, or a true break and retest. The indicator doesn’t promise miracles (nothing does), but it does something simple and powerful: it shows you context at a glance.
Why V2.0? The second major iteration tightens zone detection logic, adds smarter fresh vs. retested zone states, and improves alerting so you don’t babysit charts all day. It’s built for discretionary traders who want a repeatable workflow without getting boxed into rigid signals.
How It Works (in plain English)
- Scan Higher Timeframes: You pick which higher timeframes to reference (e.g., H1, H4, D1).
- Detect Zones: The algorithm flags price areas that led to significant moves (where imbalances likely sat).
- Project Down: Those zones are drawn on your active chart (e.g., M15) with color-coding for timeframe hierarchy.
- Track Interactions: As price comes back, the zone state updates (fresh → touched → invalidated if broken by a set buffer).
- Alert You: Set alerts when price enters, touches, or breaks the zone; optional push/sound notifications.
That’s it. No martingale nonsense, no secret sauce—just logical structure that professional traders already use, automated for speed and consistency.
Key Features You’ll Actually Use
- Multi-Timeframe Mapping: Overlay H1/H4/D1 zones on M15 or H1 execution charts.
- Fresh vs. Retested Labels: Know at a glance if a zone is brand new or already tapped.
- Smart Zone Width: Auto-width by volatility or manual input (in points or ATR-based).
- Color-Coded Timeframes: Instantly see which zones came from which TF (e.g., blue for H4, green for D1).
- Alerts That Matter: Price enters, touches, closes beyond, and retest alerts—configurable and non-spammy.
- Zone Expiry Rules: Auto-hide zones after N touches, N candles, or on invalidation by buffer-break.
- Confluence Helpers: Optional 50/200 EMA overlay, swing-structure markers, and session highlights.
- Lightweight Rendering: Optimized drawing; won’t choke your MT4 when scanning multiple pairs.
- One-Click Clean-Up: Quickly toggle zones on/off by timeframe or state to keep charts tidy.
- Template-Friendly: Save your favorite settings as templates; switch assets in seconds.
Best Pairs & Timeframes (my honest take)
- Pairs: Works across majors and XAUUSD (Gold). Also decent on indices like US30/US100 if your broker offers them.
- Execution TF: M15–H1 for most traders—fast enough for opportunities, slow enough to filter noise.
- Reference TF: H1/H4 as your default stack; add D1 for swing confluence or when markets are slow/choppy.
- Scalpers: Try M5 execution with H1 references (but set tighter buffers and alerts, coz M5 can whipsaw).
- Swing traders: Execute on H4, reference D1/W1 for wider, cleaner zones.
Setup & Inputs (quick start)
- Install: In MT4, go to File → Open Data Folder → MQL4 → Indicators and paste the indicator file. Restart MT4.
- Attach to Chart: Right-click the Navigator pane → Indicators → MTF ZONE V2.0 → attach to your execution chart (e.g., EURUSD M15).
- Core Inputs:
- Reference Timeframes:
[true/false] H1, H4, D1 - Zone Detection: swing sensitivity (Low/Med/High), body-break threshold (%), ATR multiplier
- Zone Width: fixed points or ATR-based width (recommend ATR x 1.0–1.5 for majors; 1.5–2.0 for gold)
- Validity/Expiry: max touches, max candles, invalidate on close beyond + buffer (e.g., 0.2–0.5 ATR)
- Alerts: enable entry/touch/break; push + sound; cool-down timer
- Visuals: color per TF, label text size, extend right toggle
4. Save Template: Right-click chart → Template → Save so you can apply the same stack to new symbols quickly.
A Simple Trading Workflow (so you don’t overthink)
- Mark Context: Let H1/H4 zones populate on your M15 chart.
- Filter Trend: Optional 50/200 EMA—trade with the slope and side of the EMAs for higher odds.
- Set Conditions:
- Buys: Price retests an H4 or H1 demand zone; M15 prints rejection (pin bar, engulfing, BOS on micro-structure).
- Sells: Price retests an H4 or H1 supply zone; M15 shows rejection or a lower-high.
4. Entry Trigger: Candlestick confirmation or a micro break-of-structure on M15.
5. Stops: A tad beyond the far edge of the zone (+ buffer). For gold, give it room; it’s spiky.
6. Targets:
- Conservative: mid-range or the opposite MTF zone.
- Aggressive: trail below higher lows (uptrend) or above lower highs (downtrend).
7. Manage: If the first touch fails (clean break), don’t revenge trade—wait for break and retest of the same zone from the other side.
Risk Management (the not-so-sexy edge)
- Risk per Trade: 0.5–1.0% for majors; 0.25–0.5% on XAUUSD if you’re new (gold bites).
- Position Sizing: Use ATR to normalize stop distance across different pairs.
- News Filter: Stand aside during high-impact releases; zones can blow through temporarily.
- Multiple Touches: First touches are stronger; each subsequent touch reduces edge—consider skipping after 2–3 taps.
- Correlation: Avoid stacking longs across strongly correlated pairs (e.g., EURUSD & GBPUSD) in the same zone cycle.
Backtesting & Forward Testing Tips
- Visual Backtest: Drag the chart left and watch how zones formed, touched, and expired; keep screenshots (journal!).
- Bar Replay (if you must): Simulate M15 entries with H1/H4 zones already drawn; note win rate vs. risk:reward.
- Metrics to Track:
- Touch-to-reaction rate on fresh zones
- % of trades stopped out vs. breakeven vs. target reached
- Average R multiple per setup (you want > 1.5R over a month)
- Forward Testing: 2–4 weeks on demo or tiny live, then scale. Don’t jump the gun.
Who Is This For?
- Price Action Traders who trust structure over signals.
- Intraday Swingers (M15–H1) wanting higher-TF context without juggling screens.
- Gold & Index Fans who need room for volatility but prefer clean, rule-based areas.
- Beginners who want to reduce chart noise and anchor their decisions to obvious locations.
Common Mistakes (and how to dodge them)
- Forcing Counter-Trend Touches: If EMAs slope hard against your zone, either reduce size or wait for confirmation.
- Ignoring Expired Zones: If a zone is broken decisively (close beyond + buffer), treat it as invalid until a clean retest flips it.
- Chasing Every Tap: Quality > quantity. First touch with confluence > third touch with hope.
- No Journal: If you don’t track outcomes, you won’t improve. Five minutes of notes per trade, that’s all.
Recommended Specs
- Pairs: XAUUSD, EURUSD, GBPUSD, USDJPY (works on most majors; indices optional)
- Timeframes: Execute M15–H1; reference H1/H4/D1
- Method: Supply & demand / support-resistance zones with MTF confluence
- Alerts: Touch, break, retest, with push/sound options
- Experience Level: Beginner-friendly, pro-approved
If you want an indicator that keeps your charts honest and your decisions grounded in location, context, and structure, give MTF ZONE Indicator V2.0 MT4 a proper run. It won’t trade for you, but it will make you a calmer, cleaner, more consistent trader. And honestly—that’s the edge most people miss.


Comments
Leave a Comment